
The Top Menu Bar gives the Player access to File, View and Setup functions for the Game. Probably more menu commands will be added later. All these menu items will open a pulldown menu list that will execute the functions.
 File Menu
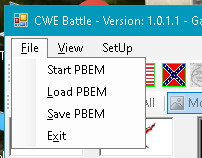
The “File” menu will open a pull-down list accessing the Game’s file related functions like saving and loading games, starting new games and exiting the Game.
- Start PBEM – Will start the process for selecting a new Play by Email game to play and entering its name.
- Load PBEM – Will let the Player open a dialog form for selecting an existing PBEM Game.
- Save PBEM – Will let the Player save a PBEM Game that hasn’t been completed yet.
- Exit – Will exit the game.
 View Menu
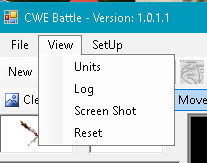
The “View” menu drop down will give you access to a few specialized commands. The first two, Units and Log, give you access to dialog displays that help you find information on units and their actions during the turn.
- Units – Will open a dialog Form that displays your armies OOB. It is described in detail below.
- Log – Will open a dialog Form that displays a log of all actions during the last turn and is described in detail below.
- Screen Shot – Will create a jpeg file of the Map portion of the Form only.
- Reset – Is a test command for resetting the Window.
 SetUp Menu
The “SetUp” menu pulls down a list of commands for resetting the Application parameters. This list includes a number of Window style commands.
- Windowed – This selection will change the Game Window back into standard Windows Form with resizing.
- Full Screen – Will convert the Game Window into a full screen (no resizing).
- Reset Screen – This resets the Game Window to a small form size. Use it to undo sizing that leaves controls unreachable.
Units Form
The Units Form is used to browse through the command structure and units of your army. It shows both the hierarchy of the Army’s organization and the Units that make up your Army. The heading for the form shows the parent organization which is the “Army of the Potomac”. The Form also gives you details on any selected HQ or Unit. Once a unit or HQ is selected you can use the Form to jump the map display directly to the selection by clicking the “GoTo” button.
To display this form select the menu items: “File” à “View” à “Units”
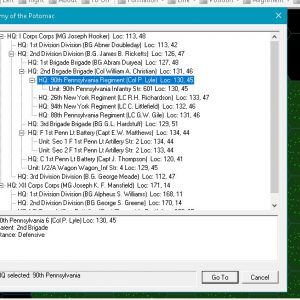
This will open the Form shown below. Initially it will show only the top organizations. In this case that would be the I Corps and XII Corps Headquarters.
By clicking on each entry line, you can expand the view to include any subordinate units. This Form uses a Tree View which shows the hierarchy along with a “-“or “+” sign which can be used to open or collapse the substructures. When a particular item is selected it will be highlighted in blue as the “HQ: 90th Pennsylvania” headquarters is above. Once select any subordinate units are shown which in this case is the Regiment for that HQ. In the text box below the Tree display details on this headquarters is displayed which currently includes the Parent HQ and the unit’s Stance. The highlighted line also shows the type HQ it is, “Regiment”, it’s current formation, “Line”, and its location, column 130 and row 45. The “GoTo” button is activated since the unit is on the map and if pressed you will leave the Units Form and the map display will move to that unit.
 Logs Form
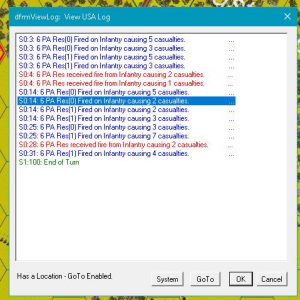
This form called by the “File” à “View” à “Log” commands will display the action report for the last turn. It shows actions like fire, melee and retreats in the sequence they occurred. Each line identifies the Unit involved and the results. Any action involving a Unit also attaches its location so that you can select an event and then jump to that location on the map.
The header to the form shows which log, in this case the “USA”, is being displayed and a list of the actions that occurred during the turn. Those in Blue are actions made by the USA Units. Those in Red are actions resulting in losses to USA Units. The highlighted (blue background) line is what you will see when you select one of the actions with the mouse. Once selected a message in the lower left tells you that the line includes a jump location. The “GoTo” button is enabled so that you can press it to return with that Unit’s hex location selected on the map.